Large Classroom with 2 Projectors and Multiple TV Displays

Zoom is a full-featured secure video communication service for online/blended classrooms, office hours and administrative meetings. It's easy to use and only requires a connection to the internet, a web-browser, or your cell phone. Features include polling, breakout rooms, office hours with digital lobby’s and a wide variety of audio options. Users can join Zoom meetings via desktops, mobile devices, telephones, and video-conferencing room systems.

Security Best Practices

ITS hosts helpful webinars to walk you through the use of these essential tools such as Zoom. In these sessions, you can learn how to use the tools to support students, conduct meetings and also connect with others in the Pace Community. View our webinar schedule.

Support

For licensing, provisioning, authentication and general support during business hours: helpdesk.pace.edu

For help with Zoom features and extended support, especially during non-business hours, please contact Zoom directly via this toll-free number: (888) 799-0125.

Create a Zoom Account

    • Navigate to the Pace hosted Zoom Web Portal
    • Select Login at the top right corner of the webpage.
    • Enter your Pace University credentials and select login.
    • Your Zoom account is created.
    Image
    Zoom Screenshot on pace portal
  • Effective immediately, all scheduled Zoom sessions at Pace University require the use of a password to gain entry. This will now be the default setting when scheduling a Zoom meeting.

    Best Password Practice

    • Create a unique password Passwords can be up to 10 characters long and can include letters, numbers and special characters.
    • Passwords can include the following:
      • Uppercase characters (A, B, C, ...)
      • Lowercase character (a, b, c, ...)
      • Numbers (1, 2, 3, ...)
      • Special characters (!,@,#,$,...)
      • Do not use your name, current passwords, or class/meeting name.
    • The same password can be set for recurring sessions. However, for added security, a new password can be created for each session.
    • For participants joining the session, notify them of the password via secure communication channels ( i.e.: Classes Email and Pace Outlook Email).
      • Please let your participants know NOT to share the meeting passcode with anyone outside of the session.

    Waiting Room

    You can include a waiting room for an extra layer of security. This allows the host to control which participant can join the meeting. The meeting host can admit attendees one by one, all at once, or move them back and forth between the waiting room. You can enable the waiting room When Scheduling a new meeting or editing a previously scheduled meeting by doing the following:

    • Under Meeting Options select Enable Waiting Room.
    • Then select Save.

    Only Authenticated Users Can Join

    You can select this option under Meeting Options when creating your meeting(s). This option adds a layer of security to your meetings by making the session only accessible to participants within the Pace community. Those that have signed in with their Pace Zoom accounts will be able to join the meeting.

    Locking Meeting

    You can lock your meeting after all participants have joined your live meeting. Once you have locked your Meeting no one else can join the session. You can lock the meeting by doing the following in a Live Zoom session:

    • Select the Manage Participants tab.
    • At the bottom of the Manage Participants window select More.
    • Select Lock Meeting.

Schedule A Zoom Meeting

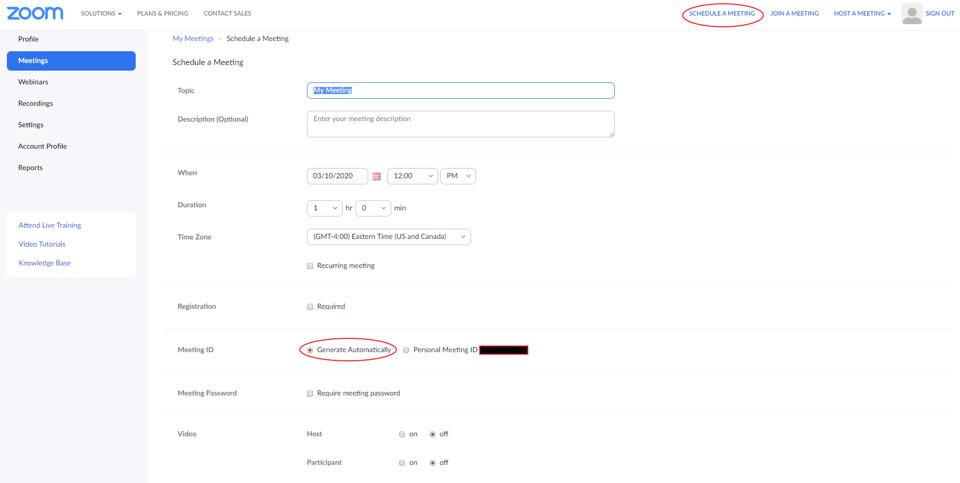
  • Once logged into your Zoom account select Schedule a Meeting located at the top right corner of the webpage and enter the following information:

    • Topic: Enter name of meeting.
    • Start: Enter the date and time of your meeting.
    • Duration: Enter the estimated duration of your meeting.
    • Time Zone: Select drop-down and enter specified time zone.
    • Recurring Meeting: Select this option if you would like this meeting to repeat over a span of time. (When selecting this option your Meeting ID will remain the same for the recurring meetings)
    • Meeting Password: Select this option if you would like to require the Participant(s) to enter a password upon entering the meeting.
    • Video: Select whether you would like the Host and/or Participant(s) to join the meeting using video. (Selecting off when joining the meeting will require users to manually turn their video on during the meeting)
    • Audio: Select whether you would like the Participant(s) to join the meeting using Telephone Audio, Computer Audio, or Both.
    • Meeting Options: Select additional settings for meeting. The Host(s) can choose to record the meeting, mute participants upon entry, enable participants to join the meeting before the host, enable a waiting room.
    • Alternative Hosts: Additional Hosts can be added by providing their email.

    Once all meeting information is entered select Save.

    Image
    Screenshot of setting up a zoom meeting

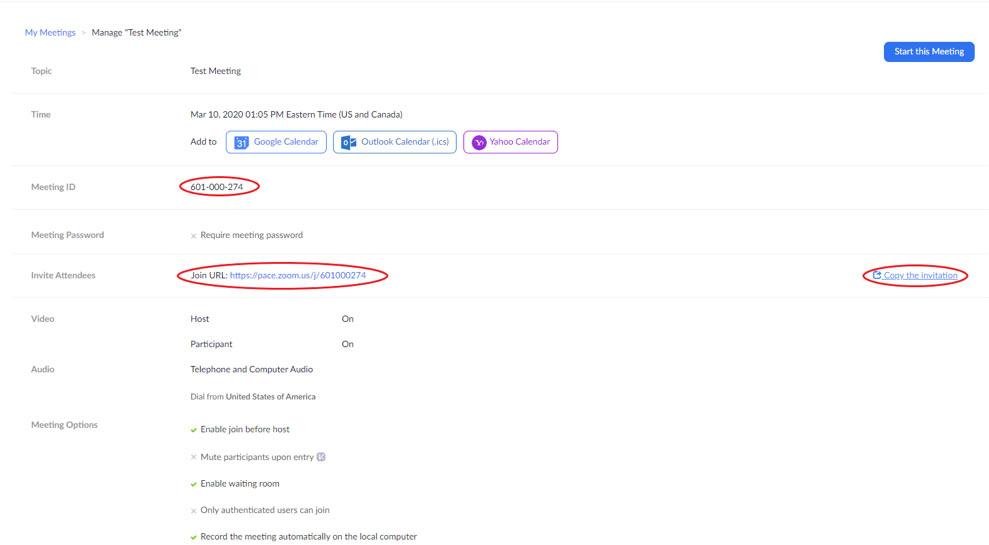
    Zoom will direct you to the meeting confirmation with a generated Meeting ID and URL you can provide to Participant(s).

    • Select Copy Meeting Invitation and send it to all your meeting participants.
    Image
    Zoom screenshot
  • When recording Zoom sessions that will be posted on publicly available websites, the following disclaimer should be used both in any communications about the event (ie: advertisements and/or confirmation emails) and displayed on a slide prior to, or at, the beginning of the event. Please customize the disclaimer with the pertinent information in the last sentence.

    • “By participating in this webinar, you automatically, permanently, and irrevocably consent to Pace University’s (the “University”) recording of audio and visual content presented during the webinar and further consent to the University’s subsequent posting of the recording on University-operated websites. The audio and visual recording of the webinar includes, but is not limited to, documents and materials exchanged or viewed during the webinar session as well as questions asked and answers provided by participants during the webinar session. At the conclusion of the webinar, the webinar audio and video recording may be made available until [enter date when content will be removed] at [enter URL(s) of site(s) where content will be hosted].”

Student Tips For Participating Online

    • Make sure you’re muted when not talking
    • Be yourself and respect others
    • Ask questions using chat
    • Use reactions to engage with your class
    • Think before you write
    • Utilize the raise your hand feature if wanting to ask a question live
    • Set up an intentional space where the class is going to happen

Faculty Tips For Teaching Through Zoom

    • Schedule your class in the Zoom application for your desired date/time and copy the invitation details to send to your students. *Please note that students will not need to register for an account to join.
      • The Zoom application can be found under the Video tab, on the Classes navbar.
    • Join your class a couple minutes early to ensure a proper connection then follow the below tips for a quality online learning experience.
    • For your first class, set aside some time to introduce your students to Zoomand ensure that they’re able to connect their audio and video.
    • Give an agenda or plan for each class by Screen Sharing a document or slide at the beginning of class. This gives students a clear idea of how the class will progress, what will be covered, and the activities they’ll engage in.
    • Discuss online etiquette and expectations of the students in your first virtual class and periodically revisit the topics.
    • Utilize the Whiteboard or Annotate a shared document and let your students engage as well. When sharing a whiteboard, document, screen, or image, try whiteboarding math problems or have a student use annotation to highlight items such as grammar mistakes in a paper you’re sharing.
    • Take time to promote questions, comments, and reactions from your class. Give a minute to allow your students to utilize reactions, write their questions in chat, or be unmuted to ask their questions live.
    • Divide into smaller groups for a discussion on a certain topic. You can use Zoom’s Breakout Room feature to either pre-assign or auto-assign students into groups for a short period of time so they may discuss things together.
    • Have students be the presenter and share projects with the class. This allows your students to show what they’re working on while practicing their presentation skills. It also allows students to hear from one another.
    • Pre-set your meeting to mute participant’s microphones upon entry. This helps to avoid background noise and allow your students to focus on your lesson.
    • Look at the camera to create eye contact with your students. This helps to create a more personal connection while teaching over video.
    • Take a second to check chat or your student’s video (if on camera) to check-in with your students and get feedback.
    • Speak as if you’re face-to-face with the class while ensuring you’re at the appropriate distance from the microphone for the best audio experience.
    • When delivering a presentation, sharing images, files or video, give your students a moment to open or take in what you’ve shared.
    • Embrace the pause. Take a moment after the end of your comments and allow for students to engage before continuing on.
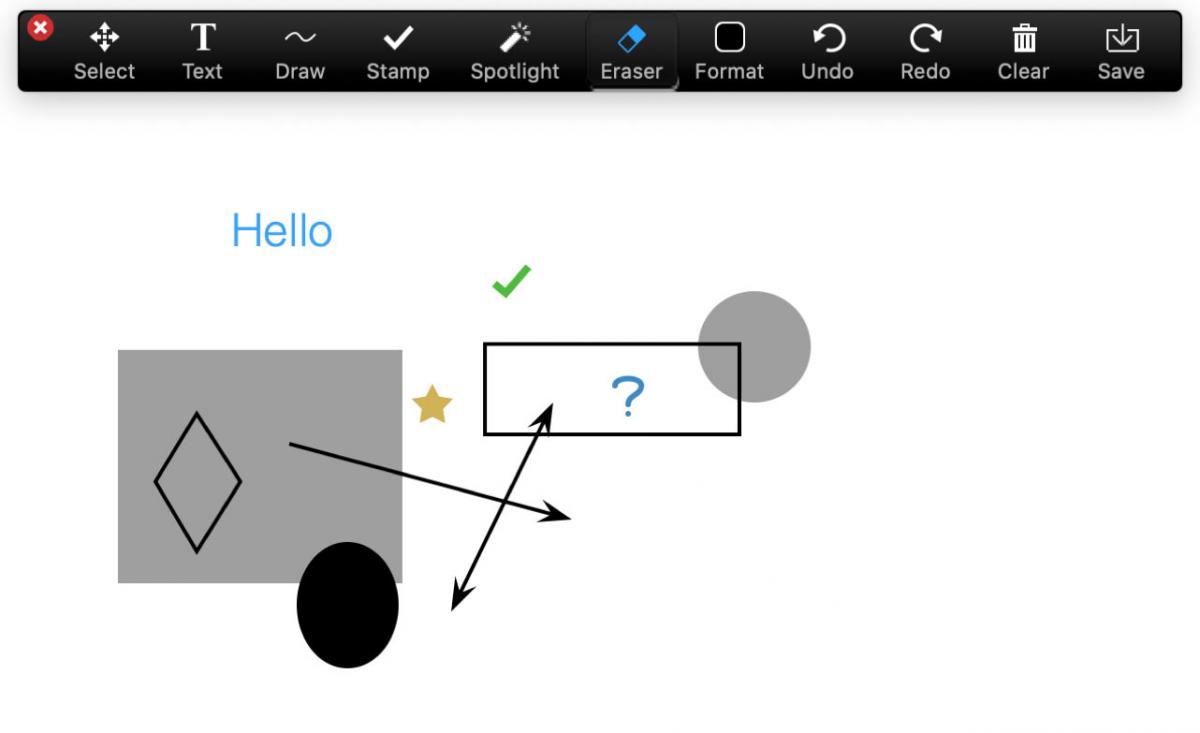
  • When in your zoom meeting as a host you have access to the whiteboard tool. This can be accessed by clicking screen share and selecting whiteboard.

    Image
    Zoom tutorial screenshot

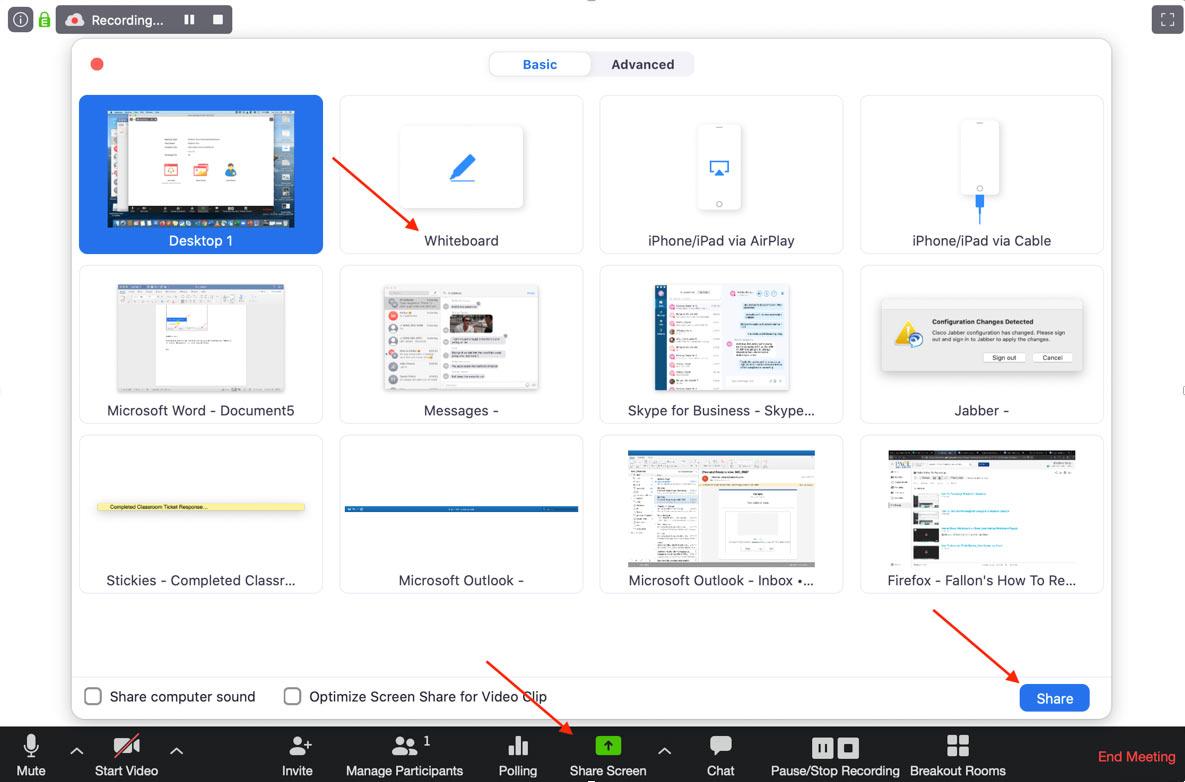
    Once open you can use the tools menu provided. You can draw, type annotate and more. In the bottom right corner there is a new page icon. This can be used to swap to a new sheet without losing your last sheet. Everything done on the whiteboard can be saved to your PC by hitting the save button on the tool bar. Sharing something new does not erase what is on the board. Ending the meeting erases what is on the board.

    The tools available from left to right:

    • Select – Allows you select and translate text or a drawing across the page
    • Text – Used to type
    • Draw – Used to draw with a pen, shape tool or arrows
    • Stamp – Quick shape tool
    • Spotlight – Turns your mouse pointer into a laser pointer
    • Eraser – Targeted deletion tool
    • Format – Changes font and color for Draw and Text tool.
    • Undo and Redo – Goes back or forward one action.
    • Clear – Erases whole page.
    • Save – Saves active page locally
    Image
    Zoom tutorial screenshot

Helpful Video Tutorials